And as soon as you unlock the device’s bootloader, one thing that you might be doing (or should do) is to replace your stock recovery with custom recovery. This is because, once the bootloader is unlocked, you get the passage to tweak the device’s system files. And this has unforeseen risks attached. If you end up in a bricked state or in a bootloop, then you can’t just access your device or even the stock recovery for that matter. There are just two things that you could get your hands on: the Fastboot/ Bootloader Mode and a Custom Recovery. And once you are inside the Recovery, there’s no stopping you from getting your device back to normal working condition. This is just one of the many benefits associated with the TWRP Recovery. Before checking out the steps to boot your Android device to TWRP, let’s have a look at some of these benefits. Also, check out our guide on How To Transfer or Install Files via TWRP Recovery.
TWRP & It’s Benefits
Team Win Recovery Project, or popularly known as TWRP is capable of performing tons of useful functionalities. The one we mentioned above is usually known as creating and restoring a Nandroid backup. Moreover, everything from installing a custom ROM to rooting your device requires a working custom recovery. Furthermore, flashing different types of ZIP and Image files is also carried out via TWRP. There’s also some technical stuff inside the Advanced options such as an in-built terminal window. Well, these are just some of the benefits associated with TWRP. With that in mind, let’s check out how you could boot your device to TWRP Recovery. But before doing so, it goes without saying that your device should have a workling recovery installed in the first place. If it isn’t head over to our detailed guide on the steps to Install TWRP Recovery on any Android Device. Now proceed with the steps to boot your device to TWRP Recovery.
How to Boot your device to TWRP Recovery
Let’s check out some of the methods to boot your device to TWRP Recovery:
Method 1: Boot using Hardware keys
Different devices have different hardware keys for this purpose. But most of the devices follow the Volume Down and Power key combination. So try turning off your device and then press the Power and Volume buttons to boot your device to TWRP recovery. However, if that doesn’t do the job for you, then a simple Google search will definitely. Or there’s a universal method for the same, but for that, you need to carry out an additional step. Let’s check out.
Method 2: Use the ADB Command (Universal Method)
Method 3: Using a Third-Party App
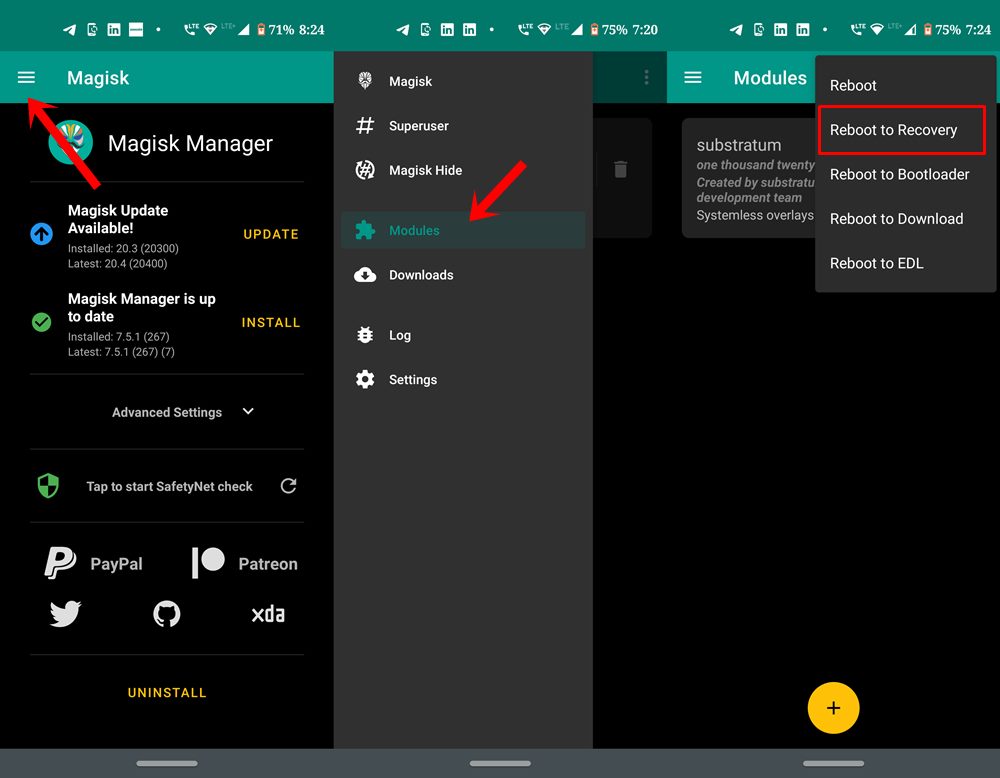
There are many third-party apps that are capable of booting your device to TWRP Recovery. They are just meant for this purpose and does its job pretty well. For all such apps to work, our device should be rooted. if it is rooted, then you must be having the Magiks Manager app installed on your device as well. In that case, you could ditch all the other apps and simply use Magisk to boot your Android device to TWRP Recovery. Here is how it could be done:
Also Read: [GUIDE] Flash ROMs/Magisk/TWRP/Kernels on A/B Partition Devices
Method 4: Temporary Boot to TWRP
Well, the above three methods required that your device should have TWRP Recovery installed. And doing so will replace the Stock Recovery. But what if you don’t wish to give up your stock recovery but still want to use TWRP for a single task. Well, that is indeed possible. To do so, follow the below steps: Don’t Miss: Install Custom ROMs on any Android Device- Includes A/B Partition
Conclusion
So with this, we come to the end of this guide on how to boot your Android device to TWRP Recovery. We have shared four different methods for the same. Do let us know which one is your preferred method. Likewise, if you have any queries, drop them in the comments section below. We will be back with the solution as quickly as possible. Happy Flashing!
Read next: Patch Stock Boot Image via Magisk and Flash it using Fastboot
About Chief Editor